Setting Up Your Todd Fish Tech Lobster Pod: An Expert Step-by-Step Guide
When your Lobster Pod arrives, it marks the beginning of an exciting venture into sustainable fisheries. Each system is thoughtfully packed to ensure it arrives in perfect condition. Now, as you prepare to set up your Lobster Pod, here’s a professional guide to help you set up your shellfish holding system with confidence.
A Strong Start: Positioning and Unpacking
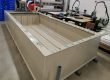
The first step is positioning your Lobster Pod on a flat surface. If your site isn’t perfectly level, hopefully you’ve already discussed levelling options with the experts at Todd Fish Tech. Assuming a flat base, you can begin unpacking the components.
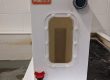
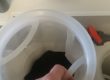
Inside, you’ll find key parts securely packed for transit: the biological media, carbon for the filter socks, hose sections for the chiller, and other vital elements like the skimmer top. Each piece has its place, and carefully unpacking and positioning them correctly ensures a smooth start. Dedicated instructional videos are available if you need guidance for specific filter components.
Plugging Into Performance
All Todd Fish Tech systems include a robust seawater chiller, packaged separately. You’ll receive hose to connect the chiller’s inlet and outlet to the Pod, which can be cut to length. The chiller comes with a 16-amp plug, and it’s strongly advised to install a rotary switch and waterproof sockets for safety and convenience.
Before adding water, take a moment to unpack the bottom tray filled with essentials: a user manual, dip-strip water test kit, spare air diffuser, hose clips, a refractometer, o-rings for the UV steriliser, and a bottle of Stability—a critical tool for the maturation phase.
Bringing the Pod to Life
Before introducing water, confirm all manifolds are upright, siphon break covers are open, and that the UV steriliser, air pump, and switch block are all okay. Begin by filling the sump to just above the level of the sock shelf. This ensures the pumps remain submerged once circulation begins. Balance the flow through each filtration stack using the top valves, adjusting until the outflow from each is equal.
Ensure the UV steriliser bypass is properly set—with two valves open and one closed—so water flows through the steriliser as intended. Maturation: The Foundation of Success Now comes the biological heart of your system—adding Stability. This initiates the maturation of your filtration system by fostering the growth of beneficial bacteria. To protect this process, switch off the UV steriliser for about a week.
Then, gradually introduce your lobsters. For a 300kg-capacity system, begin with no more than 20. This staged approach allows the bacteria to develop in harmony with the lobsters’ waste output, creating a balanced, resilient ecosystem. Set your chiller to 12°C to encourage optimal bacterial growth. While the system can operate between 8–12°C, starting warmer supports a stronger start. Once the system is mature, you may reduce the temperature if desired.
Onward and Upward
Once the Lobster Pod is fully operational, your shellfish storage journey has officially begun. This is not just a technical installation—it’s the start of a dynamic, sustainable process to help you store healthy and happy shellfish and grow new markets getting the best price possible to maximise your profits.
And remember, you’re never alone in this. If you need support—during setup, maturation, or beyond—help is just a phone call or email away. With the right foundation, your Lobster Pod will deliver performance, reliability, and the satisfaction of contributing to responsible fishing.
Welcome to the next chapter in sustainable seafood.
For more info please email us at hello@toddfistech.com